Introduction
The simplest Lightspeed Cloud deployment: one VM on an isolated network with a public IP. The example workload is a cPanel/WHM web hosting server, but the pattern applies to any single-server workload - a game server, a small ERP, a build agent.
What you deploy
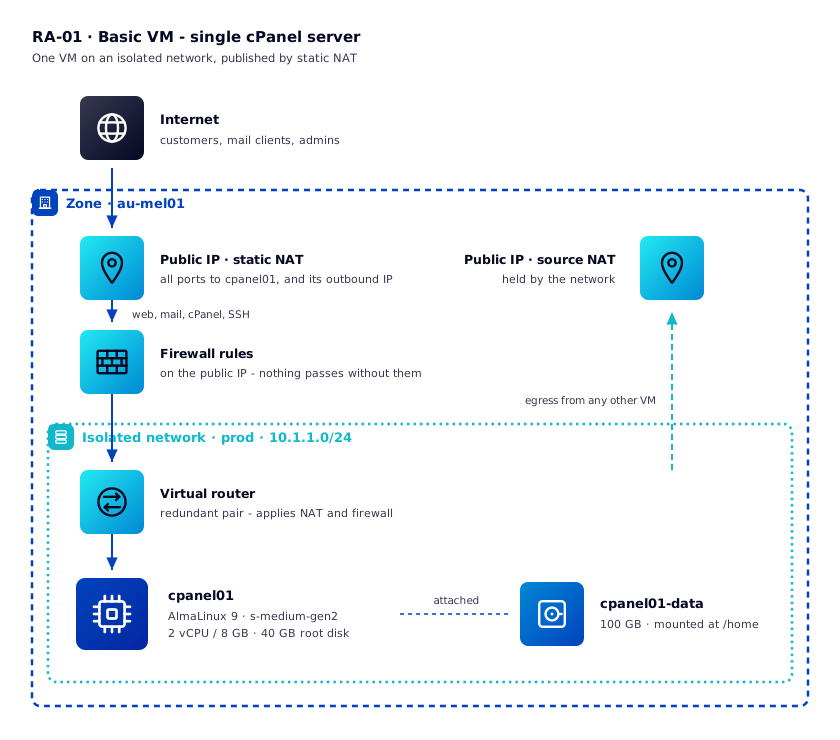
- One isolated network (
net-isolated-std-v1) with a redundant virtual router. - One VM (
cpanel01) running AlmaLinux 9 ons-medium-gen2- 2 vCPU / 8 GB. - One 100 GB data volume mounted at
/home. - A public IP published to the VM by static NAT (or port forwarding), with firewall rules for web, mail and control panel traffic.
This suits a single server that needs its own identity on the internet. If you're running more than one server behind shared routing, or you need private tiers that aren't internet-reachable, start with a VPC instead.
Architecture
Traffic flow
Users reach the static NAT public IP. The redundant virtual router applies the firewall rules and forwards all traffic to cpanel01. Outbound traffic from cpanel01 leaves via that same static NAT IP - egress is allowed by default on net-isolated-std-v1.
The second public IP is held by the network for source NAT. It's allocated automatically when the network is first created and it carries egress for any other VM you later add to the network.
The data volume keeps customer sites on a disk that survives VM rebuilds and can be snapshotted independently of the root disk.
Resource plan
| Resource | Value | Notes |
|---|---|---|
| Zone | au-mel01 | |
| Network offering | net-isolated-std-v1 | Redundant virtual router, egress allowed, source NAT |
| Guest subnet | 10.1.1.0/24 | Zone default guest CIDR, assigned automatically |
| Compute offering | s-medium-gen2 | 2 vCPU / 8 GB. cPanel's minimum is 2 GB; 8 GB is a comfortable production floor |
| Template | almalinux-9 | cPanel supports AlmaLinux 8/9, Rocky 8/9 and Ubuntu 22.04 |
| Root disk | 40 GB | OS and cPanel software |
| Data volume | 100 GB, mounted at /home | Sites, mail and databases live here |
| Public IPs | 2 | One held by the network for source NAT (allocated automatically), one dedicated to static NAT. A single-IP alternative is covered below |
Check these against your account's resource limits before you start - public IPs in particular are a commonly capped resource.
Publishing the VM: static NAT or port forwarding
The isolated network already holds one public IP, allocated automatically for source NAT when the network was first implemented. All outbound traffic from the network leaves via this IP. Inbound traffic is blocked by default.
There are two ways to publish cpanel01. Pick one before you start building.
| Option A: port forwarding | Option B: static NAT | |
|---|---|---|
| Public IPs used | 1 - the existing source NAT IP | 2 - source NAT plus a dedicated IP |
| VM outbound IP | The source NAT IP, shared with every VM on the network | The VM's own static NAT IP |
| Forwards | Only the ports you list | All ports |
| Suits | A single VM where one shared IP is enough | A VM that needs its own identity on the internet, and any network that will grow past one published VM |
For a cPanel server, use Option B. Mail reputation depends on a PTR record matching the IP that outbound mail originates from, and the cPanel licence binds to the server's public IP. A dedicated static NAT IP gives you both, and stays correct when you add more VMs to the network.
Option A is documented because it's the right answer for a single VM that doesn't send mail - an internal application server, for example.
Static NAT constraints
Static NAT can't be enabled on the source NAT IP, and once it's enabled on an IP that IP carries no other rules - no port forwarding, no load balancing. See Public IPs and static NAT for the general rules.
1-65535 under Option A is possible but not recommended. It monopolises the IP, collides with services the virtual router offers on it (such as VPN), and gives you none of the benefits of Option B. If you want everything forwarded, use static NAT.Firewall plan
Rules are applied to the public IP you publish the VM on. Everything not explicitly allowed here is dropped.
| Ports (TCP) | Service | Open to |
|---|---|---|
| 80, 443 | HTTP/HTTPS | Anywhere |
| 2082, 2083 | cPanel | Anywhere, or restrict to your users |
| 2095, 2096 | Webmail | Anywhere |
| 25, 465, 587 | SMTP | Anywhere - mail server |
| 110, 995, 143, 993 | POP3/IMAP | Anywhere - mail clients |
| 53 TCP + UDP | DNS | Anywhere, only if this server is authoritative for its domains |
| 22 | SSH | Admin IPs only |
| 2086, 2087 | WHM | Admin IPs only |
Portal walkthrough
1. Register your SSH key
Compute → SSH key pairs → Create SSH key pair. Name it (ops-key) and paste your public key. See SSH keypairs for details.
2. Create the isolated network
Network → Guest networks → Add network. Select Isolated, name it prod, zone au-mel01, offering net-isolated-std-v1. Leave gateway and netmask blank - the platform assigns 10.1.1.0/24.
3. Deploy the VM
Compute → Instances → Add instance.
- Template:
almalinux-9 - Compute offering:
s-medium-gen2 - Root disk: 40 GB (override if the dialog offers it)
- Network:
prod - SSH key pair:
ops-key - Name:
cpanel01
4. Add the data volume
Storage → Volumes → Create volume. Name it cpanel01-data, 100 GB, then Attach it to cpanel01.
5. Publish the VM to the internet
Follow whichever option you chose in Publishing the VM above.
Option A - port forwarding on the source NAT IP. Go to Network → Guest networks → prod → Public IP addresses, select the IP marked as the source NAT IP, open the Port forwarding tab and add a rule per service: public port, private port, protocol, then select cpanel01. Add a rule for each of 80, 443, 2082-2083, 2095-2096, 25, 465, 587, 110, 995, 143, 993, 22 and 2086-2087. Port forwarding rules have no source address field, so the admin-only restriction on 22 and 2086-2087 comes from the firewall rules in step 6.
Option B - static NAT on a dedicated public IP. Go to Network → Guest networks → prod → Public IP addresses → Acquire new IP. This is a second IP, separate from the source NAT IP. On the new IP, select Static NAT → Enable and choose cpanel01. Outbound traffic from cpanel01 now leaves via this IP rather than the source NAT IP, so this is the IP that needs the PTR record and the one the cPanel licence binds to.
6. Add firewall rules
On the public IP you used in step 5, open the Firewall tab and add the rules from the firewall plan. Use your office or VPN CIDR for the SSH and WHM rules. These rules are what makes traffic pass - without them, both static NAT and port forwarding stay closed.
cpanel01 behind NAT. In WHM, under Basic WebHost Manager Setup, set the server's public IP so cPanel advertises the correct address in mail headers, DNS records and licence checks.Installing cPanel
SSH in as the template's default user, then switch to root:
# 1. Prepare the data volume (first attach only)
mkfs.xfs /dev/vdb
echo '/dev/vdb /home xfs defaults 0 0' >> /etc/fstab
mount -a

# 2. Hostname must be a real FQDN that resolves to the public IP
hostnamectl set-hostname server1.example.com

# 3. Update and install
dnf -y update
cd /home && curl -o latest -L https://securedownloads.cpanel.net/latest && sh latest
The installer takes 30 to 60 minutes. When it finishes, log in to WHM at https://<public-ip>:2087 as root and complete the setup wizard. A 15-day trial licence activates automatically against the public IP - buy a licence for that IP before the trial ends.
Deploy with CloudMonkey
CloudMonkey is the CloudStack CLI. Configure it with the API key and secret key from your account settings, pointed at https://cloud.lightspeedhosting.com.au/client/api. These commands mirror the portal walkthrough step for step.
# 1. Register your SSH key
cmk register sshkeypair name=ops-key publickey="$(cat ~/.ssh/id_ed25519.pub)"

# 2. Create the isolated network
ZONE=$(cmk list zones name=au-mel01 filter=id | jq -r '.zone[0].id')
NETOFF=$(cmk list networkofferings name=net-isolated-std-v1 filter=id | jq -r '.networkoffering[0].id')
cmk create network name=prod displaytext=prod zoneid=$ZONE networkofferingid=$NETOFF

# 3. Deploy the VM
TMPL=$(cmk list templates templatefilter=executable keyword="almalinux-9" filter=id | jq -r '.template[0].id')
OFFER=$(cmk list serviceofferings name=s-medium-gen2 filter=id | jq -r '.serviceoffering[0].id')
NET=$(cmk list networks name=prod filter=id | jq -r '.network[0].id')
cmk deploy virtualmachine name=cpanel01 zoneid=$ZONE templateid=$TMPL \
  serviceofferingid=$OFFER networkids=$NET keypair=ops-key rootdisksize=40

# 4. Create and attach the data volume
DISKOFF=$(cmk list diskofferings name="Custom" filter=id | jq -r '.diskoffering[0].id')
VM=$(cmk list virtualmachines name=cpanel01 filter=id | jq -r '.virtualmachine[0].id')
VOL=$(cmk create volume name=cpanel01-data zoneid=$ZONE diskofferingid=$DISKOFF size=100 | jq -r '.volume.id')
cmk attach volume id=$VOL virtualmachineid=$VM
5. Publish the VM - Option B (static NAT)
IP=$(cmk associate ipaddress networkid=$NET | jq -r '.ipaddress.id')
cmk enable staticnat ipaddressid=$IP virtualmachineid=$VM
5. Publish the VM - Option A (port forwarding)
SRCNAT=$(cmk list publicipaddresses associatednetworkid=$NET issourcenat=true filter=id | jq -r '.publicipaddress[0].id')

for p in 80:80 443:443 2082:2083 2095:2096 25:25 465:465 587:587 \
         110:110 995:995 143:143 993:993 22:22 2086:2087; do
  cmk create portforwardingrule ipaddressid=$SRCNAT virtualmachineid=$VM protocol=tcp \
    publicport=${p%%:*} publicendport=${p##*:} \
    privateport=${p%%:*} privateendport=${p##*:} openfirewall=false
done
openfirewall=false matches what the portal does, and keeps firewall rules as the single place where source restrictions live. Setting it to true makes the platform create a matching allow-from-anywhere firewall rule for you, which is wrong for the admin ports.6. Firewall rules
# Option B: $IP is the static NAT IP from step 5.
# Option A: use $SRCNAT in place of $IP.
ADMIN=203.0.113.4/32   # your admin CIDR

for p in "80:80" "443:443" "2082:2083" "2095:2096" "25:25" "465:465" "587:587" \
         "110:110" "995:995" "143:143" "993:993"; do
  cmk create firewallrule ipaddressid=$IP protocol=tcp \
    startport=${p%%:*} endport=${p##*:} cidrlist=0.0.0.0/0
done

for p in "22:22" "2086:2087"; do
  cmk create firewallrule ipaddressid=$IP protocol=tcp \
    startport=${p%%:*} endport=${p##*:} cidrlist=$ADMIN
done
Deploy with Ansible
This playbook implements Option B (static NAT). It needs the CloudStack collection and its Python dependencies:
ngine_io.cloudstack 3.x. Every module was renamed in 3.0.0 - the cs_ prefix was dropped, so cs_instance is now instance and cs_sshkeypair is now ssh_key. Anything you wrote against 2.x still runs via redirects, but those carry a removal date that has already passed, and each task emits a deprecation warning. 3.0.0 also raised the floor to cs>=3.4.0. Note the --upgrade flag: several distributions bundle 2.5.0, and a plain install will see it and report "Nothing to do".ansible-galaxy collection install ngine_io.cloudstack --upgrade
pip install 'cs>=3.4.0' sshpubkeyssshpubkeys is a hard dependency of ssh_key, which fails at import without it.
Credentials come from the environment. The collection reads these three variables directly, so no api_url / api_key / api_secret arguments are needed on the tasks:
export CLOUDSTACK_ENDPOINT=https://cloud.lightspeedhosting.com.au/client/api
export CLOUDSTACK_KEY=<api key>
export CLOUDSTACK_SECRET=<secret key>
---
# ra01-cpanel.yml - deploy RA-01 basic cPanel server
# Targets ngine_io.cloudstack 3.x (modules renamed in 3.0.0; requires cs>=3.4.0)
- name: RA-01 basic VM with cPanel
hosts: localhost
connection: local
gather_facts: false
vars:
zone: au-mel01
admin_cidr: 203.0.113.4/32 # your admin network
template: almalinux-9
web_ports: [{s: 80, e: 80}, {s: 443, e: 443}, {s: 2082, e: 2083},
{s: 2095, e: 2096}, {s: 25, e: 25}, {s: 465, e: 465},
{s: 587, e: 587}, {s: 110, e: 110}, {s: 995, e: 995},
{s: 143, e: 143}, {s: 993, e: 993}]
admin_ports: [{s: 22, e: 22}, {s: 2086, e: 2087}]
tasks:
- name: Register SSH key
ngine_io.cloudstack.ssh_key:
name: ops-key
public_key: "{{ lookup('file', '~/.ssh/id_ed25519.pub') }}"
- name: Create isolated network
ngine_io.cloudstack.network:
name: prod
zone: "{{ zone }}"
network_offering: net-isolated-std-v1
- name: Deploy instance
ngine_io.cloudstack.instance:
name: cpanel01
zone: "{{ zone }}"
template: "{{ template }}"
service_offering: s-medium-gen2
networks: [prod]
ssh_keys: [ops-key]
root_disk_size: 40
- name: Create and attach data volume
ngine_io.cloudstack.volume:
name: cpanel01-data
zone: "{{ zone }}"
disk_offering: Custom
size: 100
vm: cpanel01
state: attached
# The tag is what makes this idempotent. Without it, ip_address cannot
# find the IP it acquired last time and acquires another one on every run.
# Use exactly one tag: the module's matching logic sorts the tag list and
# raises a TypeError on two or more.
- name: Acquire public IP on the network
ngine_io.cloudstack.ip_address:
zone: "{{ zone }}"
network: prod
tags:
- key: purpose
value: cpanel01-staticnat
register: pub
- name: Enable static NAT
ngine_io.cloudstack.static_nat:
ip_address: "{{ pub.ip_address }}"
vm: cpanel01
zone: "{{ zone }}"
- name: Public firewall rules
ngine_io.cloudstack.firewall:
ip_address: "{{ pub.ip_address }}"
zone: "{{ zone }}"
protocol: tcp
start_port: "{{ item.s }}"
end_port: "{{ item.e }}"
cidrs: [0.0.0.0/0]
loop: "{{ web_ports }}"
- name: Admin firewall rules
ngine_io.cloudstack.firewall:
ip_address: "{{ pub.ip_address }}"
zone: "{{ zone }}"
protocol: tcp
start_port: "{{ item.s }}"
end_port: "{{ item.e }}"
cidrs: ["{{ admin_cidr }}"]
loop: "{{ admin_ports }}"
- name: Show public IP
ansible.builtin.debug:
msg: "cpanel01 is reachable at {{ pub.ip_address }}"Installing cPanel itself is host configuration, not infrastructure. Run it as a second play against the new IP, or pass the install commands above as user data.
For Option A instead
Drop the ip_address and static_nat tasks and use portforward against the source NAT IP. Its open_firewall parameter defaults to false, matching the portal, so keep the firewall tasks:
    - name: Port forward to cpanel01
      ngine_io.cloudstack.portforward:
        ip_address: "{{ source_nat_ip }}"
        zone: "{{ zone }}"
        vm: cpanel01
        protocol: tcp
        public_port: "{{ item.s }}"
        public_end_port: "{{ item.e }}"
        private_port: "{{ item.s }}"
        private_end_port: "{{ item.e }}"
      loop: "{{ web_ports + admin_ports }}"
Deploy with Terraform
This configuration implements Option B (static NAT). Unlike the portal, the provider requires cidr on cloudstack_network, so the guest subnet is stated explicitly rather than left to the zone default. Keep it inside the zone's guest CIDR range.
# ra01-cpanel.tf - deploy RA-01 basic cPanel server
terraform {
  required_providers {
    cloudstack = {
      source  = "cloudstack/cloudstack"
      version = "~> 0.5"
    }
  }
}

variable "api_url"    { default = "https://cloud.lightspeedhosting.com.au/client/api" }
variable "api_key"    { sensitive = true }
variable "secret_key" { sensitive = true }
variable "admin_cidr" { default = "203.0.113.4/32" }

provider "cloudstack" {
  api_url    = var.api_url
  api_key    = var.api_key
  secret_key = var.secret_key
}

resource "cloudstack_ssh_keypair" "ops" {
  name       = "ops-key"
  public_key = file("~/.ssh/id_ed25519.pub")
}

resource "cloudstack_network" "prod" {
  name             = "prod"
  zone             = "au-mel01"
  network_offering = "net-isolated-std-v1"
  cidr             = "10.1.1.0/24"
}

resource "cloudstack_instance" "cpanel01" {
  name             = "cpanel01"
  zone             = "au-mel01"
  template         = "almalinux-9"
  service_offering = "s-medium-gen2"
  network_id       = cloudstack_network.prod.id
  keypair          = cloudstack_ssh_keypair.ops.name
  root_disk_size   = 40
  expunge          = true
}

resource "cloudstack_disk" "data" {
  name               = "cpanel01-data"
  zone               = "au-mel01"
  disk_offering      = "Custom"
  size               = 100
  attach             = true
  virtual_machine_id = cloudstack_instance.cpanel01.id
}

resource "cloudstack_ipaddress" "pub" {
  zone       = "au-mel01"
  network_id = cloudstack_network.prod.id
}

resource "cloudstack_static_nat" "cpanel01" {
  ip_address_id      = cloudstack_ipaddress.pub.id
  virtual_machine_id = cloudstack_instance.cpanel01.id
}

resource "cloudstack_firewall" "cpanel01" {
  ip_address_id = cloudstack_ipaddress.pub.id

  rule {
    cidr_list = ["0.0.0.0/0"]
    protocol  = "tcp"
    ports     = ["80", "443", "2082-2083", "2095-2096",
                 "25", "465", "587", "110", "995", "143", "993"]
  }

  rule {
    cidr_list = [var.admin_cidr]
    protocol  = "tcp"
    ports     = ["22", "2086-2087"]
  }
}

output "public_ip" {
  value = cloudstack_ipaddress.pub.ip_address
}
terraform init
terraform validate
terraform apply -var api_key=... -var secret_key=...For Option A instead
Replace the cloudstack_ipaddress, cloudstack_static_nat and cloudstack_firewall resources with cloudstack_port_forward blocks pointed at the network's source NAT IP, plus a cloudstack_firewall on the same IP for the source restrictions.
Verify
ssh <template-user>@<public-ip>works from your admin CIDR, and times out from anywhere else.curl -I http://<public-ip>returns a response once cPanel is installed.- WHM login at
https://<public-ip>:2087works from your admin CIDR only. df -h /homeshows the 100 GB data volume.- Outbound works from the VM:
curl -I https://securedownloads.cpanel.net.
Day 2 operations
- Snapshots. Schedule recurring volume snapshots on both the root and data volumes, under Storage → Volumes → Snapshots. Take one before every cPanel version upgrade.
- Scaling up. Stop the VM and change the compute offering -
s-large-gen2for 4 vCPU / 16 GB. Dynamic scaling is enabled on gen2 offerings for online upsizing where the guest supports it. See resizing a VM. - Backups. cPanel's own backup tool can target remote destinations. Pair on-server backups on the data volume with an off-server destination such as our S3-compatible object storage.
- Don't change the public IP. The cPanel licence and mail reputation are both tied to it. If the VM is rebuilt, re-enable static NAT from the same IP to the new VM.
- Adding a second VM to this network. It shares the source NAT IP for egress and needs its own publishing decision: another static NAT IP, or port forwarding rules on the source NAT IP using ports that don't collide with
cpanel01.