Introduction
A classic three-server web application in a VPC: a web server, an application server and a database, all sharing one subnet behind a network ACL. This is the smallest deployment that gives you private addressing, a VPC router and room to grow, and it's the natural next step once one server is no longer enough.
What you deploy
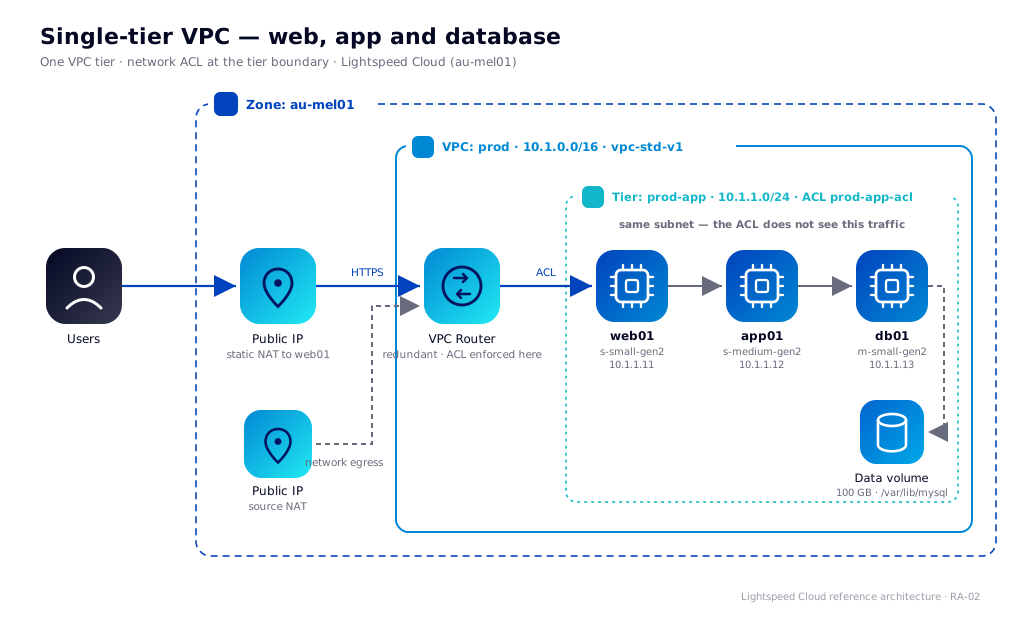
- One VPC (
prod,10.1.0.0/16) onvpc-std-v1with a redundant VPC router. - One network tier (
prod-app,10.1.1.0/24) onnet-vpctier-std-v1, governed by a custom network ACL. - Three VMs -
web01,app01anddb01- with static guest IPs. - One 100 GB data volume on
db01for the database. - A public IP published to
web01by static NAT.
This suits an application whose components you want on private addresses, reachable from the internet only through the web tier. If you need the network itself to stop the web server talking to the database, you want separate tiers instead - that's RA-03. If one server is enough, RA-01 is simpler and cheaper.
Architecture
Traffic flow
Users reach the static NAT public IP. The VPC router applies the tier's ingress ACL and forwards traffic to web01. web01 calls app01, and app01 queries db01, both over the tier's own subnet.
That last sentence is the important one. Traffic between VMs in the same tier never reaches the VPC router, so the network ACL never sees it and can't filter it. The ACL is a boundary control: it applies to traffic entering or leaving the tier, not to traffic within it. See What a single tier isolates below.
The VPC also holds a source NAT public IP, allocated automatically when the VPC is created. Outbound traffic from app01 and db01 leaves via that IP; outbound from web01 leaves via its static NAT IP.
Resource plan
| Resource | Value | Notes |
|---|---|---|
| Zone | au-mel01 | |
| VPC offering | vpc-std-v1 | Redundant VPC router, NAT, ACLs, VPN, load balancing |
| VPC CIDR | 10.1.0.0/16 | Sized for growth. Only 10.1.1.0/24 is used here |
| Tier offering | net-vpctier-std-v1 | Public load balancer capable, network ACL enforced at the tier boundary |
| Tier subnet | 10.1.1.0/24, gateway 10.1.1.1 | |
web01 | s-small-gen2, 10.1.1.11 | 2 vCPU / 4 GB. nginx or Apache |
app01 | s-medium-gen2, 10.1.1.12 | 2 vCPU / 8 GB. Application runtime |
db01 | m-small-gen2, 10.1.1.13 | 2 vCPU / 16 GB. Memory-optimised for the database working set |
| Root disks | 40 GB each | |
| Data volume | 100 GB on db01, mounted at /var/lib/mysql | Survives VM rebuilds, snapshots independently |
| Public IPs | 2 | One source NAT IP held by the VPC automatically, one static NAT IP for web01 |
Check these against your account's resource limits before you start.
Why the VPC is a /16 when you only need a /24
The VPC CIDR is fixed at creation and every tier must sit inside it. A /16 costs nothing, and it means 10.1.2.0/24 and 10.1.3.0/24 are still available when you decide to split this application into separate web, app and database tiers. Growing into RA-03 later then becomes a migration of VMs between tiers rather than a rebuild of the whole VPC.
What a single tier isolates
This is the design trade-off of RA-02, and it's worth being blunt about.
| Traffic | Controlled by the ACL? |
|---|---|
Internet to web01 | Yes - ingress rules |
web01, app01 or db01 to the internet | Yes - egress rules |
| Another VPC tier to this tier | Yes - ingress rules |
web01 to db01 | No |
app01 to db01 | No |
Network ACLs are applied by the VPC router at the tier boundary. Two VMs in 10.1.1.0/24 talk to each other directly over the guest network without their packets ever passing through the router, so there's no point at which an ACL could act on them. Writing a deny rule for 10.1.1.11 to 10.1.1.13 will not do anything.
CloudStack security groups, which do filter VM to VM traffic, aren't available on VPC tiers on this platform.
So in a single-tier VPC, isolation between roles is a host responsibility. Configure a host firewall on each VM, as covered in Host firewall configuration. If you'd rather the network enforced it, that's RA-03: the same three servers in three tiers, where every cross-role packet has to traverse the router and can be filtered.
app01 and db01 have no public IP, no static NAT and no port forwarding, so they're unreachable from the internet regardless of the host firewall. The gap is lateral movement: if web01 is compromised, nothing in the network stops it reaching the database port.Network ACL plan
The tier uses a custom ACL, prod-app-acl. Rules are numbered with gaps of ten so you can insert without renumbering. Anything not matched is denied.
ACL item with number 100 already exists. That's why ingress uses the 100 band below and egress uses the 200 band. It's a convention, not a platform rule - any non-overlapping split works - but keeping the two directions in separate bands makes the collision impossible to hit as the rule set grows.Ingress
| Number | Action | Protocol | Ports | Source |
|---|---|---|---|---|
| 100 | Allow | TCP | 80 | 0.0.0.0/0 |
| 110 | Allow | TCP | 443 | 0.0.0.0/0 |
| 120 | Allow | TCP | 22 | Admin CIDR |
Egress
| Number | Action | Protocol | Ports | Destination |
|---|---|---|---|---|
| 200 | Allow | TCP | 80 | 0.0.0.0/0 |
| 210 | Allow | TCP | 443 | 0.0.0.0/0 |
| 220 | Allow | UDP | 53 | 0.0.0.0/0 |
| 230 | Allow | TCP | 53 | 0.0.0.0/0 |
| 240 | Allow | UDP | 123 | 0.0.0.0/0 |
Egress is deny-by-default here, which is the right posture but does mean anything the servers need outbound has to be listed. The rules above cover package updates over HTTP and HTTPS, DNS and NTP. Add SMTP submission on 587 if the application sends mail, and note that a database replicating off-platform or a backup agent shipping to object storage both need their own rules.
Two differences from RA-01 worth internalising:
- In a VPC there's no firewall tab on public IPs. Ingress control is the tier ACL and nothing else. Static NAT and port forwarding decide where traffic goes; the ACL decides whether it's allowed.
- Return traffic is permitted automatically. The VPC router tracks connections, so an allowed outbound request gets its reply back without a matching ingress rule. You don't write mirrored rules.
Publishing web01
web01 is published with static NAT on a dedicated public IP, exactly as in RA-01. The VPC already holds a source NAT IP for egress, so this is a second public IP.
The single-IP alternative is port forwarding 80 and 443 from the VPC's source NAT IP to web01. It saves an IP; it also means web01 shares its outbound identity with app01 and db01, which matters if the application sends mail or calls an API that allowlists source IPs.
Portal walkthrough
1. Register your SSH key
Compute → SSH key pairs → Create SSH key pair. Name it ops-key and paste your public key. See SSH keypairs for details.
2. Create the VPC
Network → VPC → Add VPC. Name prod, zone au-mel01, super CIDR 10.1.0.0/16, offering vpc-std-v1. Leave the network domain blank to inherit the default.
The VPC router is created and a source NAT public IP is allocated automatically.
3. Create the network ACL
Network → VPC → prod → Network ACL lists → Add ACL list. Name it prod-app-acl.
Open the new list and add each rule from the network ACL plan. The dialog asks for rule number, CIDR, action, protocol, start port, end port and traffic type.
egressdefaultpolicy=true) - so a VM deployed into it during that window is unreachable until the ACL is attached. A tier can be re-pointed at a different ACL later, but start with the right one.4. Create the tier
Network → VPC → prod → Add network tier. Name prod-app, offering net-vpctier-std-v1, gateway 10.1.1.1, netmask 255.255.255.0, ACL prod-app-acl.
Unlike an isolated network, a VPC tier needs its gateway and netmask stated explicitly. They must fall inside the VPC's super CIDR.
5. Deploy the three VMs
Compute → Instances → Add instance, three times. Template almalinux-9, network prod-app, SSH key ops-key, root disk 40 GB, and:
| Name | Compute offering | IP address |
|---|---|---|
web01 | s-small-gen2 | 10.1.1.11 |
app01 | s-medium-gen2 | 10.1.1.12 |
db01 | m-small-gen2 | 10.1.1.13 |
Set the IP explicitly in the network section of the dialog. Left blank, CloudStack allocates from the bottom of the range and you lose the predictable addressing the host firewall rules depend on.
6. Add the database volume
Storage → Volumes → Create volume. Name it db01-data, 100 GB, then Attach it to db01.
7. Publish web01
Network → VPC → prod → Public IP addresses → Acquire new IP. On the new IP, select Static NAT → Enable, choose web01, and select the prod-app tier when prompted.
Host firewall configuration
Because the ACL can't filter within the tier, each VM carries its own rules. These examples use firewalld on AlmaLinux 9. Run them as root on each VM.
web01 - public facing, so this mostly duplicates the ACL as defence in depth:
firewall-cmd --permanent --add-service=http
firewall-cmd --permanent --add-service=https
firewall-cmd --permanent --add-rich-rule='rule family=ipv4 source address=203.0.113.4/32 service name=ssh accept'
firewall-cmd --permanent --remove-service=ssh
firewall-cmd --reload
app01 - accepts the application port from web01 only:
firewall-cmd --permanent --add-rich-rule='rule family=ipv4 source address=10.1.1.11/32 port port=8080 protocol=tcp accept'
firewall-cmd --permanent --add-rich-rule='rule family=ipv4 source address=203.0.113.4/32 service name=ssh accept'
firewall-cmd --permanent --remove-service=ssh
firewall-cmd --reload
db01 - accepts MySQL from app01 only, and specifically not from web01:
firewall-cmd --permanent --add-rich-rule='rule family=ipv4 source address=10.1.1.12/32 port port=3306 protocol=tcp accept'
firewall-cmd --permanent --add-rich-rule='rule family=ipv4 source address=203.0.113.4/32 service name=ssh accept'
firewall-cmd --permanent --remove-service=ssh
firewall-cmd --reload
Also prepare the database volume on db01 before installing MySQL or MariaDB:
mkfs.xfs /dev/vdb
mkdir -p /var/lib/mysql
echo '/dev/vdb /var/lib/mysql xfs defaults 0 0' >> /etc/fstab
mount -aDeploy with CloudMonkey
CloudMonkey is the CloudStack CLI. Configure it with the API key and secret key from your account settings, pointed at https://cloud.lightspeedhosting.com.au/client/api. These commands mirror the portal walkthrough step for step.
# 1. Register your SSH key
cmk register sshkeypair name=ops-key publickey="$(cat ~/.ssh/id_ed25519.pub)"

# 2. Create the VPC
ZONE=$(cmk list zones name=au-mel01 filter=id | jq -r '.zone[0].id')
VPCOFF=$(cmk list vpcofferings name=vpc-std-v1 filter=id | jq -r '.vpcoffering[0].id')
VPC=$(cmk create vpc name=prod displaytext=prod zoneid=$ZONE \
  cidr=10.1.0.0/16 vpcofferingid=$VPCOFF | jq -r '.vpc.id')
3. Create the network ACL and its rules
ADMIN=203.0.113.4/32   # your admin CIDR
ACL=$(cmk create networkacllist name=prod-app-acl \
  description="ACL for the prod-app tier" vpcid=$VPC | jq -r '.networkacllist.id')

# Ingress - the 100 band
cmk create networkacl aclid=$ACL number=100 action=allow protocol=tcp \
  startport=80 endport=80 cidrlist=0.0.0.0/0 traffictype=ingress
cmk create networkacl aclid=$ACL number=110 action=allow protocol=tcp \
  startport=443 endport=443 cidrlist=0.0.0.0/0 traffictype=ingress
cmk create networkacl aclid=$ACL number=120 action=allow protocol=tcp \
  startport=22 endport=22 cidrlist=$ADMIN traffictype=ingress

# Egress - the 200 band. Numbers are unique across the whole list,
# so these cannot reuse 100/110/120.
cmk create networkacl aclid=$ACL number=200 action=allow protocol=tcp \
  startport=80 endport=80 cidrlist=0.0.0.0/0 traffictype=egress
cmk create networkacl aclid=$ACL number=210 action=allow protocol=tcp \
  startport=443 endport=443 cidrlist=0.0.0.0/0 traffictype=egress
cmk create networkacl aclid=$ACL number=220 action=allow protocol=udp \
  startport=53 endport=53 cidrlist=0.0.0.0/0 traffictype=egress
cmk create networkacl aclid=$ACL number=230 action=allow protocol=tcp \
  startport=53 endport=53 cidrlist=0.0.0.0/0 traffictype=egress
cmk create networkacl aclid=$ACL number=240 action=allow protocol=udp \
startport=123 endport=123 cidrlist=0.0.0.0/0 traffictype=egressnumber is allowed - the platform assigns the highest number currently in the list plus one. That's fine for a first build, but it means the numbering depends on the order the calls happen to land in, so state the numbers explicitly if you want the rule set to match the plan above.4. Create the tier
TIEROFF=$(cmk list networkofferings name=net-vpctier-std-v1 filter=id | jq -r '.networkoffering[0].id')
TIER=$(cmk create network name=prod-app displaytext=prod-app zoneid=$ZONE \
  networkofferingid=$TIEROFF vpcid=$VPC gateway=10.1.1.1 netmask=255.255.255.0 \
  aclid=$ACL | jq -r '.network.id')
5. Deploy the three VMs
TMPL=$(cmk list templates templatefilter=executable keyword="almalinux-9" filter=id | jq -r '.template[0].id')

deploy_vm () {   # name  offering  ip
  OFF=$(cmk list serviceofferings name=$2 filter=id | jq -r '.serviceoffering[0].id')
  cmk deploy virtualmachine name=$1 zoneid=$ZONE templateid=$TMPL \
    serviceofferingid=$OFF networkids=$TIER ipaddress=$3 \
    keypair=ops-key rootdisksize=40
}

deploy_vm web01 s-small-gen2  10.1.1.11
deploy_vm app01 s-medium-gen2 10.1.1.12
deploy_vm db01  m-small-gen2  10.1.1.13
6. Create and attach the database volume
DISKOFF=$(cmk list diskofferings name="Custom" filter=id | jq -r '.diskoffering[0].id')
DB=$(cmk list virtualmachines name=db01 filter=id | jq -r '.virtualmachine[0].id')
VOL=$(cmk create volume name=db01-data zoneid=$ZONE diskofferingid=$DISKOFF size=100 | jq -r '.volume.id')
cmk attach volume id=$VOL virtualmachineid=$DB
7. Publish web01 with static NAT
WEB=$(cmk list virtualmachines name=web01 filter=id | jq -r '.virtualmachine[0].id')
IP=$(cmk associate ipaddress vpcid=$VPC | jq -r '.ipaddress.id')
cmk enable staticnat ipaddressid=$IP virtualmachineid=$WEB networkid=$TIER
enable staticnat needs networkid when the public IP belongs to a VPC. Without it the call fails, because the platform can't infer which tier the target VM is on.Deploy with Ansible
Same requirements as RA-01:
ngine_io.cloudstack 3.x. Every module was renamed in 3.0.0 - the cs_ prefix was dropped, so cs_instance is now instance and cs_sshkeypair is now ssh_key. Anything you wrote against 2.x still runs via redirects, but those carry a removal date that has already passed, and each task emits a deprecation warning. 3.0.0 also raised the floor to cs>=3.4.0. Note the --upgrade flag: several distributions bundle 2.5.0, and a plain install will see it and report "Nothing to do".ansible-galaxy collection install ngine_io.cloudstack --upgrade
pip install 'cs>=3.4.0' sshpubkeys
export CLOUDSTACK_ENDPOINT=https://cloud.lightspeedhosting.com.au/client/api
export CLOUDSTACK_KEY=<api key>
export CLOUDSTACK_SECRET=<secret key>---
# ra02-single-tier-vpc.yml - deploy RA-02 single-tier VPC
- name: RA-02 single-tier VPC with web, app and database
hosts: localhost
connection: local
gather_facts: false
vars:
zone: au-mel01
admin_cidr: 203.0.113.4/32 # your admin network
template: almalinux-9
vpc_cidr: 10.1.0.0/16
tier_gateway: 10.1.1.1
tier_netmask: 255.255.255.0
instances:
- {name: web01, offering: s-small-gen2, ip: 10.1.1.11}
- {name: app01, offering: s-medium-gen2, ip: 10.1.1.12}
- {name: db01, offering: m-small-gen2, ip: 10.1.1.13}
# rule_position maps to the CloudStack rule number, which is unique
# across the whole ACL list. Ingress takes the 100 band, egress the 200
# band - see the note below.
acl_ingress:
- {n: 100, protocol: tcp, s: 80, e: 80, cidr: 0.0.0.0/0}
- {n: 110, protocol: tcp, s: 443, e: 443, cidr: 0.0.0.0/0}
- {n: 120, protocol: tcp, s: 22, e: 22, cidr: "{{ admin_cidr }}"}
acl_egress:
- {n: 200, protocol: tcp, s: 80, e: 80, cidr: 0.0.0.0/0}
- {n: 210, protocol: tcp, s: 443, e: 443, cidr: 0.0.0.0/0}
- {n: 220, protocol: udp, s: 53, e: 53, cidr: 0.0.0.0/0}
- {n: 230, protocol: tcp, s: 53, e: 53, cidr: 0.0.0.0/0}
- {n: 240, protocol: udp, s: 123, e: 123, cidr: 0.0.0.0/0}
tasks:
- name: Register SSH key
ngine_io.cloudstack.ssh_key:
name: ops-key
public_key: "{{ lookup('file', '~/.ssh/id_ed25519.pub') }}"
- name: Create VPC
ngine_io.cloudstack.vpc:
name: prod
zone: "{{ zone }}"
cidr: "{{ vpc_cidr }}"
vpc_offering: vpc-std-v1
- name: Create network ACL
ngine_io.cloudstack.network_acl:
name: prod-app-acl
description: ACL for the prod-app tier
vpc: prod
zone: "{{ zone }}"
- name: Ingress ACL rules
ngine_io.cloudstack.network_acl_rule:
network_acl: prod-app-acl
vpc: prod
zone: "{{ zone }}"
rule_position: "{{ item.n }}"
action_policy: allow
traffic_type: ingress
protocol: "{{ item.protocol }}"
start_port: "{{ item.s }}"
end_port: "{{ item.e }}"
cidrs: ["{{ item.cidr }}"]
loop: "{{ acl_ingress }}"
- name: Egress ACL rules
ngine_io.cloudstack.network_acl_rule:
network_acl: prod-app-acl
vpc: prod
zone: "{{ zone }}"
rule_position: "{{ item.n }}"
action_policy: allow
traffic_type: egress
protocol: "{{ item.protocol }}"
start_port: "{{ item.s }}"
end_port: "{{ item.e }}"
cidrs: ["{{ item.cidr }}"]
loop: "{{ acl_egress }}"
- name: Create the VPC tier
ngine_io.cloudstack.network:
name: prod-app
zone: "{{ zone }}"
vpc: prod
acl: prod-app-acl
network_offering: net-vpctier-std-v1
gateway: "{{ tier_gateway }}"
netmask: "{{ tier_netmask }}"
- name: Deploy instances
ngine_io.cloudstack.instance:
name: "{{ item.name }}"
zone: "{{ zone }}"
template: "{{ template }}"
service_offering: "{{ item.offering }}"
networks: [prod-app]
ip_address: "{{ item.ip }}"
ssh_keys: [ops-key]
root_disk_size: 40
loop: "{{ instances }}"
- name: Create and attach the database volume
ngine_io.cloudstack.volume:
name: db01-data
zone: "{{ zone }}"
disk_offering: Custom
size: 100
vm: db01
state: attached
# The tag is what makes this idempotent. Without it, ip_address cannot
# find the IP it acquired last time and acquires another one on every run.
# Use exactly one tag: the module's matching logic sorts the tag list and
# raises a TypeError on two or more.
- name: Acquire public IP on the VPC
ngine_io.cloudstack.ip_address:
zone: "{{ zone }}"
vpc: prod
tags:
- key: purpose
value: web01-staticnat
register: pub
- name: Enable static NAT to web01
ngine_io.cloudstack.static_nat:
ip_address: "{{ pub.ip_address }}"
vm: web01
vpc: prod
network: prod-app
zone: "{{ zone }}"
- name: Show public IP
ansible.builtin.debug:
msg: "web01 is reachable at {{ pub.ip_address }}"rule_position is the ACL rule number, and it's the module's entire idea of rule identity. It matches an existing rule on the number alone - it does not also compare the traffic type. So reusing a number across the two directions doesn't produce a duplicate error from the module; it finds the ingress rule and rewrites it into an egress rule, and you silently end up with fewer rules than you wrote. Keeping ingress and egress in separate number bands, as above, avoids that entirely. Reusing a number with different contents within one direction updates that rule in place, which is what makes re-runs safe.The host firewall configuration is a separate concern. Run it as a second play against the three VMs using ansible.posix.firewalld, or bake it into the template.
Deploy with Terraform
The CloudStack provider changed the shape of ACL rules in 0.6.0, so this configuration pins ~> 0.6.0 rather than a looser constraint. See Provider notes below before you widen it.
# ra02-single-tier-vpc.tf - deploy RA-02 single-tier VPC
terraform {
  required_providers {
    cloudstack = {
      source  = "cloudstack/cloudstack"
      version = "~> 0.6.0"
    }
  }
}

variable "api_url"    { default = "https://cloud.lightspeedhosting.com.au/client/api" }
variable "api_key"    { sensitive = true }
variable "secret_key" { sensitive = true }
variable "admin_cidr" { default = "203.0.113.4/32" }

provider "cloudstack" {
  api_url    = var.api_url
  api_key    = var.api_key
  secret_key = var.secret_key
}

locals {
  zone = "au-mel01"

  instances = {
    web01 = { offering = "s-small-gen2",  ip = "10.1.1.11" }
    app01 = { offering = "s-medium-gen2", ip = "10.1.1.12" }
    db01  = { offering = "m-small-gen2",  ip = "10.1.1.13" }
  }

  # One entry per rule, mirroring the ACL plan exactly.
  acl_rules = [
    { number = 100, protocol = "tcp", port = "80",  cidr = "0.0.0.0/0",     traffic = "ingress" },
    { number = 110, protocol = "tcp", port = "443", cidr = "0.0.0.0/0",     traffic = "ingress" },
    { number = 120, protocol = "tcp", port = "22",  cidr = var.admin_cidr,  traffic = "ingress" },
    { number = 200, protocol = "tcp", port = "80",  cidr = "0.0.0.0/0",     traffic = "egress" },
    { number = 210, protocol = "tcp", port = "443", cidr = "0.0.0.0/0",     traffic = "egress" },
    { number = 220, protocol = "udp", port = "53",  cidr = "0.0.0.0/0",     traffic = "egress" },
    { number = 230, protocol = "tcp", port = "53",  cidr = "0.0.0.0/0",     traffic = "egress" },
    { number = 240, protocol = "udp", port = "123", cidr = "0.0.0.0/0",     traffic = "egress" },
  ]
}

resource "cloudstack_ssh_keypair" "ops" {
  name       = "ops-key"
  public_key = file("~/.ssh/id_ed25519.pub")
}

resource "cloudstack_vpc" "prod" {
  name         = "prod"
  display_text = "prod"
  cidr         = "10.1.0.0/16"
  vpc_offering = "vpc-std-v1"
  zone         = local.zone
}

resource "cloudstack_network_acl" "prod_app" {
  name        = "prod-app-acl"
  description = "ACL for the prod-app tier"
  vpc_id      = cloudstack_vpc.prod.id
}

resource "cloudstack_network_acl_rule" "prod_app" {
  acl_id = cloudstack_network_acl.prod_app.id

  dynamic "rule" {
    for_each = local.acl_rules
    content {
      rule_number  = rule.value.number
      action       = "allow"
      cidr_list    = [rule.value.cidr]
      protocol     = rule.value.protocol
      port         = rule.value.port
      traffic_type = rule.value.traffic
    }
  }
}

resource "cloudstack_network" "prod_app" {
  name             = "prod-app"
  cidr             = "10.1.1.0/24"
  network_offering = "net-vpctier-std-v1"
  vpc_id           = cloudstack_vpc.prod.id
  acl_id           = cloudstack_network_acl.prod_app.id
  zone             = local.zone
}

resource "cloudstack_instance" "vm" {
  for_each = local.instances

  name             = each.key
  zone             = local.zone
  template         = "almalinux-9"
  service_offering = each.value.offering
  network_id       = cloudstack_network.prod_app.id
  ip_address       = each.value.ip
  keypair          = cloudstack_ssh_keypair.ops.name
  root_disk_size   = 40
  expunge          = true
}

resource "cloudstack_disk" "db_data" {
  name               = "db01-data"
  zone               = local.zone
  disk_offering      = "Custom"
  size               = 100
  attach             = true
  virtual_machine_id = cloudstack_instance.vm["db01"].id
}

resource "cloudstack_ipaddress" "web" {
  zone   = local.zone
  vpc_id = cloudstack_vpc.prod.id
}

resource "cloudstack_static_nat" "web01" {
  ip_address_id      = cloudstack_ipaddress.web.id
  virtual_machine_id = cloudstack_instance.vm["web01"].id
}

output "web_public_ip" {
  value = cloudstack_ipaddress.web.ip_address
}
terraform init
terraform validate
terraform apply -var api_key=... -var secret_key=...Provider notes
Three behaviours of the CloudStack provider are worth knowing before you adapt this.
The tier is resolved from the VM, so cloudstack_static_nat needs no tier argument. Where CloudMonkey makes you pass networkid, the provider looks the VM up and enables static NAT against the network of its first NIC. For the three single-NIC VMs here that is always prod-app, and the resource works on a VPC public IP as written.
The caveat is that it's the first NIC rather than a chosen one. If you later give a VM a second NIC in another tier, add vm_guest_ip to pin which address gets published:
resource "cloudstack_static_nat" "web01" {
  ip_address_id      = cloudstack_ipaddress.web.id
  virtual_machine_id = cloudstack_instance.vm["web01"].id
  vm_guest_ip        = "10.1.1.11"
}
The provider matches that address against the VM's NICs, including secondary IPs, and uses the matching NIC's network. It's harmless on a single-NIC VM and it makes the intent explicit, so it's reasonable to set it from the start.
Rule numbers are yours to choose, from 0.6.0 onward. Each rule block takes an optional rule_number (1-65535), which is passed straight through as the CloudStack rule number - so the Terraform rule set can match the ACL plan number for number, exactly like the CloudMonkey and Ansible versions. Leave it out and it becomes a computed value: the platform assigns the next number, and because the provider creates rules concurrently (two at a time by default, tunable with parallelism), the numbering won't reliably follow the order you wrote them in. State the numbers.
One port per rule block. 0.6.0 replaced the old ports list with a single port string, accepting either "80" or a range like "8000-8010". The old field still appears in the schema but is rejected at create time with "The 'ports' field is no longer supported", so older examples written as ports = ["80", "443"] will plan cleanly and then fail on apply. Write one block per port, as the dynamic block above does.
~> 0.6.0 and not ~> 0.5. A two-part constraint like ~> 0.5 allows any 0.x from 0.5.0 up, so it silently resolves to 0.6.0 and a configuration written for 0.5 fails on apply. Pin the minor while the provider is pre-1.0.Verify
curl -I http://<public-ip>reachesweb01.- SSH to
web01works from your admin CIDR and times out from anywhere else. - From
web01,curl -I https://almalinux.orgsucceeds (egress 443 allowed) andnc -vz 203.0.113.1 4444fails (egress denied by default). Use a host you control if you want the second half to be conclusive - a connection to an arbitrary address on a closed port fails whether the ACL dropped it or not. - From
app01,mysql -h 10.1.1.13 -u app -pconnects. - The intra-tier test. From
web01, runnc -vz 10.1.1.13 3306. Before you apply the host firewall ondb01, this succeeds even though no ACL rule permits it - which demonstrates that the ACL doesn't filter within the tier. After you apply the host firewall, it fails. That before-and-after is worth doing once so the boundary is understood rather than assumed. df -h /var/lib/mysqlondb01shows the 100 GB volume.- The ACL list shows eight rules - three ingress and five egress. If it shows fewer, a rule number was reused across the two directions; see the network ACL plan.
Day 2 operations
- Adding a tier later. Create it inside the same VPC on an unused
/24such as10.1.2.0/24, give it its own ACL, and move VMs across. The VPC, its public IPs and its VPN keep working throughout. This is the path from RA-02 to RA-03. - Changing ACL rules. Rules take effect on the VPC router immediately - no VM restart is needed. Adding or removing a tier does restart the router, which briefly interrupts NAT and VPN.
- Snapshots. Schedule recurring snapshots on
db01's data volume. Snapshot the root volumes before OS upgrades. - Backups. A volume snapshot isn't a database backup. Run a logical dump on
db01to object storage as well. - Scaling up. Stop the VM and change its compute offering.
db01is the usual first candidate -m-medium-gen2gives 4 vCPU and 32 GB. See resizing a VM. - Scaling out. Two web servers behind a public load balancer, and an internal load balancer in front of the application servers, is RA-04. It also needs
net-vpctier-intlb-v1for the internal LB tier, which a single tier can't provide alongside the public LB offering. - Watch the host firewall rules. They encode the VM IP addresses. If you rebuild a VM and it comes back on a different address, the rules silently stop matching. Pin the IPs, as in step 5.